
How to really light up those plant starts
For most of us, even the sunniest window doesn't provide enough light to keep seedlings happy and healthy during the time of year we need to start our seedlings. Consider grow lights...
Why use grow lights?
Plants need light to carry out photosynthesis, converting carbon dioxide and water into food to fuel growth. We humans need to consume a certain number of calories each day. So too with plants— plants need a certain volume of photons each day. How much varies with species and stage of growth.
Picture plants that get tall and ‘leggy’-- leaning and stretching towards a window. Without adequate light, your seedlings will get lanky and weak, struggling to produce enough food to grow into healthy plants.

Pay attention to light requirements
Plants labeled as requiring "full sun" tend to be the ones that really NEED bright light. Supporting them with grow lights will gift you back many times over with healthier seedlings and a strong start to the gardening season. "Full sun" seedlings include most flowers and vegetable seedling, as well as warm season annuals like tomatoes and pepper plants.
If you're new to grow lights some considerations include:
- What type of plants you want to start?
- What are their light requirements?
- How many trays you're starting?
- How much space do they need?
- What shelving will you use?
- How much headroom does your shelving allow for light fixtures and plant growth?
- How many lights fixtures you will need?
- What lighting and costs does your budget allow?
Key Decisions to be made are: “Full spectrum vs. Cool blue vs. Dual Band?” and “Fluorescent vs LED Grow Lights?”
Light Frequencies— “Full Spectrum vs. Cool Blue vs. Dual Band?”
First, let’s consider the choice of light frequencies to use. Color temperature describes the color of the light frequencies produced by the grow light. It is measured on the Kelvin (K) scale (think K = Color) from 1,000 K (warm or red) to 10,000 K (cool or blue).

If you are focusing on starting plants for your garden, you would choose a full spectrum grow light with a color temperature in the blue range (5,000 - 7,000K) to promote leafy green foliage. Notice this correlates to 'Noon Daylight High Sun' on the color scale. By the way-- a color temperature in the red range (3,500 - 4,500K) is used to promote fruiting and flowering. Think of those long summer days and the amount of early morning and late date sun... equals more fruits and flowers!
Let’s dive deeper— As young kids we were taught the colors of the rainbow— the ROYGBIV spectrum: Red, Orange, Yellow, Green, Blue, Indigo, and Violet. That was only part of the story. There are other spectrums of light the human eye can’t see, just like there are sound frequencies the human ear can’t hear.
The spectrum of light that is absorbed by chlorophyll and is used by plants for various functions is called “photosynthetically active radiation” or PAR. Chlorophyll absorbs light from the PAR spectrum converting it into energy during photosynthesis.
There are many colors or frequencies of light in the PAR spectrum, but not all these light frequencies are visible to our eye. Each color is associated with different functions in plants. Some light frequencies or colors are more useful or efficient for various stages of plant health than others.
Our eye does not perceive red or blue light as being very bright. However, these two ranges provide the most ‘efficient’ light frequencies plant cells require to produce energy. “Dual band” grow lights take advantage of both colors, blending them for a purple or pink cast to generate ‘optimal' plant growth.
While plants primarily use blue and red light, there is research that indicates some species perform better with full spectrum light. Choosing a full spectrum light will help ensure plants have what they need. 'Full-spectrum' or 'broad spectrum' lights are closer to natural sunlight.
You may want to consider looking for those marked 6500 kelvin (k). These bulbs provide full spectrum light but leaning toward a little more blue light, to promote foliage growth.
Light Fixture— “Fluorescent vs LED Grow Lights?”
Second question to consider is, what is your preference of light fixtures— “Fluorescent vs LED Grow Lights?”

LEDs
LED grow lights are the latest trend. LED stands for light emitting diodes. Some advantages include:
- Energy efficiency— they are over 40% more energy efficient than fluorescent;
- They produce more lumens of light with less electricity;
- They are touted as having a longer lifespan; and
- Are available in more flexible shapes and sizes than fluorescent grow lights.
More energy efficient translates into less 'waste' heat and more light being generated for the energy consumed. LED convert most of their electricity into light. LED light fixtures will run at about 75-80℉ versus fluorescent at about 100-110℉ on the top of the light fixture.
However, there are trade-offs. Prices for LEDs have gone down considerably in recent years but they still have higher upfront costs.
When purchasing LED grow lights considerations include the spectrum of light to be used, the wattage, and the number of lumens given off. Remembering higher wattage will equal more lumens and more distance from your plants. Higher lumens equals more growing power. (More on that in a minute!)

If you have never used LED grow lights, be prepared to experiment. You may want to start by suspending the lights higher than you think necessary and move in, watching for any negative reactions.
Here's the model I recommend using-- and you can link up to 8 of 'em together too!
Fluorescents
Besides being the lower cost option, fluorescent grow lights are ideal for shelving systems with limited space between shelves.
When choosing fluorescent light fixtures for grow lights find a fixture that reflects the light down onto your plants. This will maximize efficiency, enabling the plants to use more of the light for growth.
Options include:
- The traditional T-12 tube, which fits most fixtures. They are not as efficient for starting plants, but two bulbs will provide enough light for seedlings and it has the lowest upfront cost.
- The T-8 fluorescent tubes put out more light than the T-12 and are specifically recommended for growing plants. T-8s should be kept 2-3" above the plants.
- T-5 fluorescent bulbs are considered high-efficiency and are bright enough to replace two T-12 bulbs. These brighter bulbs should be kept a little higher above the plants, at about 5-6".
You guessed it-- T-5s are the most expensive, followed by T-8s with the lowest cost being T-12s. Predictably, you get what you put in!
How Bright and How Many?
As you shop light fixtures and bulbs, look for rating information on the number of lumens the grow light is designed to emit. This is a measure of the visible light it produces. The more lumens the brighter the light.
When shopping for energy efficient LED lights, rather than lumens, pay attention to the number of watts; the higher the wattage the more light it produces. As a rule of thumb LED technology typically produces 75-110 lumens/watt. So a 100 watt LED light would emit between 7500 to 11,000 lumens.
T12 fluorescent lights give off about 2,500 lumens; T8 and T5 give off about 2,800 lumens each.
Seedlings that require 'full sun' need a minimum of 2,500 lumens per square foot of growing space. For example, if your shelf is 2 feet wide by 3 feet long, or the equivalent of 6 square feet-- multiply (2,500 lumens x 6 sq ft) to know that you need a minimum of 15,000 lumens per shelf. Buy your grow lights accordingly. In case math isn't your strong suit, be assured that most grow lights provide the specifications on the square footage they are designed cover.
Safety first
When purchasing your grow lights, look for UL certification to ensure the light fixture has been tested to meet electrical safety standards. Install, mount, or hang your lights securely. Follow all manufacturer's instructions. If using grow lights where they may be exposed to moisture, seek out fixtures specifically designed for those environments. Make sure they are connected to a grounded outlet.
As with any light fixture, to protect your eyes, do not look directly at the light bulbs. This is even more imperative with LED lights.
How high to hang them?
Another consideration is how high above your plants to set your grow lights. The more lumens you provide, the higher above the plants you can be.
For fluorescent lights the T12 should hang about 2" above your plants. The T8 and T5 bulbs are higher output and should hang a little higher above the plants-- 4 to 6" is a good rule of thumb.
For LED lights I like use a bench mark of 2,000 lumens at about 6" above your plants. For every additional thousand lumens you go up about an inch. So at 3,000 lumens you can go up to about 7" above your plants, at 4,000 lumens go up to about 8", and at 5,000 lumens you can go up to about 9" above your plants.
You want your lights close but not 'too close'! You can also 'burn' your plants with too much light! And different grow lights can have different effects. So start a little high and slowly lower while watching for ill effects. And as your seedlings grow, keep raising the height of your grow lights.
Fortunately, your plants will let you know when it’s getting too much light but you have to be watchful. The plants will show physical symptoms. You might see the leaves start to droop followed by changes in color. Next pale or brown spots, or yellowing leaves can show up even though the veins are green and healthy looking. Dry patches and browning at the tips of the leaves might become apparent as well. Watch for wilting in younger seedlings. Some plants might curl downward as the exposure continues, or they'll just stop growing. Watch for any of these signs. If you see them, raise the lights higher.
Matching the size and dimension of the grow lights to the size and dimension of your shelving will make things easier! When considering the space required to grow transplants from seed— to seedlings— to garden-ready transplants… remember that most gardeners repot their seedlings from small seed-starting trays to larger containers at least once. The move to a larger cell size also increases the space plants will need under your grow lights!
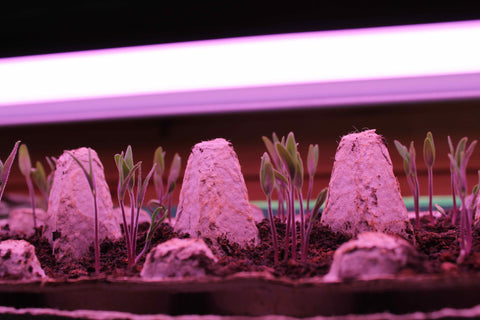
Starting Seedlings
Seeds generally do not need light to sprout. The exception is some flowers seeds that are specifically labeled to be surface sown and 'need daylight to germinate'. However, actual daylight hours is sufficient for germination and no grow lights are required until after your seedling begin to emerge from the soil.
Be vigilant! You will want to watch carefully and provide light as soon as possible after emergence. Freshly sprouted seedlings can get 'leggy' fast!

Knowing the number of days to germination (see your seed packet information) is important. You could play it safe by turning on the lights a day or two before you expect the seedling to pop up.
Seedlings require more light than most mature plants. Once they germinate, they are developing their first true leaves and root system. To get off to a strong start seedlings require a lot of energy. They are “light hungry”. Think of a child on a growth spurt constantly saying, “I’m hungry!” Seedlings need a high volume of light energy measured in photons. Mimic a plant's natural environment, giving them 12-16 hours of light. Setting a timer will help to ensure there is a regular rhythm to their 'day' and 'night'.
Capturing and enhancing light
While most grow light fixtures are built to amplify and direct the light downward, you can help capture and bounce light back onto your plants. One method is to line either side of your shelving with white paper or some type of foil to bounce the light you are producing back to your plants. Some growth tents are specifically designed with this beneficial feature. Or you can grow in a closet with white walls.
Earlier we discussed how our human eye perceives brightness but that perception may not translate into usable photon energy for plants. Watching how your plant growth is progressing will tell you a lot in terms of how well your system is supplying the photons your plants need.
You can purchase an inexpensive light meter or even download a light meter app on your smart phone. These options measure light in lumens— a measurement of visual brightness, not the volume of usable light for photosynthesis. However, these measurements will give you a general sense of the brightness of your space.
Preventing damping off
You might consider providing a gentle breeze on your seedlings as they grow. Not only does it help to prevent damping-off – a fungal disease that attacks young seedlings – but it gives your seedlings some exercise as well. They idea is that they'll develop hardier stalks get used to waving in the breeze.
We've never used a fan for our indoor starts and if some of our seedlings succumb to damping off-- we chalk that up to survival of the fittest. We like to challenge our varieties and 'weed out' the most vulnerable. And, hopefully, our selection work translates into less issues for you when you grow our seeds.
So you decide if you want to use a fan or not. If you do, make sure to adjust your watering schedule so your plants don't dry out.
Top Take-Aways
For seed starting look for a 'Full Spectrum' grow light in the 5,000 - 7,000K range. Provide at least 2,500 lumens per square foot of planting trays. Pay attention to how high your lights are positioned above your trays. Watch your plants to see if they are 'reaching' for the light (lights are too high) or exhibiting symptoms of too much light (lights are too low).
Hope these tips are helpful to you!
Wishing you every success in your seed starting efforts!
Your garden coach,
Theresa