
Your Seed Starting Mix Happens Here- Easy Recipe for Success

Starting seeds indoors opens up a world of choices! You get to choose what varieties of tomatoes, peppers, lettuce, and herbs will grace your garden-- diversity and varieties not available at your local garden center or nursery! Once your have your seeds, outline your plan using our Seed Starting Planner.
It all starts with your seed starting mix. Seed starting mixes create an ideal environment for seed germination, seedlings, and transplants. It doesn't need to be complicated. And a successful method that is easily repeatable and successful is ideal!
Ingredients
There are a number of commonly used ingredients for seed starting mixes. Let me tell you a little more about each of them-- and which ones we recommend.
Look For the OMRI Seal
When sourcing ingredients you can look for products that are approved by the Organic Materials Review Institute (OMRI). OMRI Listed® products are allowed for use in certified organic operations under the USDA National Organic Program. This is a big deal if you are a certified organic operation.
Even if you are NOT concerned with organic certification, the OMRI seal gives you added assurance that there are no foreign substances, such as wetting agents, added to the ingredients you are purchasing for your garden. You can look for the seal on the brands you purchase or research specific products and brands on OMRI's new search tool.
Sphagnum or Peat Moss (OMRI search: peat moss or Sphagnum peat moss)

Peat moss is a natural material used in many soil mixes for starting and growing plants. You may be familiar with peat pots, made from compressed peat moss and paper. Peat moss comes from natural deposits called bogs, found in northern latitudes in countries, such as Canada.
There are two issues with peat moss: 1) It is considered a finite resource, the mining of which can cause environmental damage. 2) It can be a source of bacterial and fungal spores, which can damage seedlings. For these two reasons, WE DO NOT RECOMMEND peat moss.
Rock Wool

Rock Wool is a growing media made by melting a mixture of basalt, coke and limestone into lava at very high temperatures and then spun like cotton candy. You may be familiar with its use as an insulation or sound barrier. Rock wool holds a lot of water and is used in large commercial hydroponic operations.
Some problems with this medium: Special steps are needed to mitigate its alkaline PH. It is not biodegradable, making disposal an environmental concern. It can cause irritation of skin, eyes and lungs. It is also listed by the EPA as a possible carcinogen. It is NOT OMRI listed and is NOT approved for certified organic production. Obviously... WE DO NOT RECOMMEND using rock wool!
Recommended Ingredients
We like these ingredients:
Perlite (OMRI search: perlite soil amendment)
Perlite is an amorphous volcanic glass which is mined and heated to 1,800℉ causing it to expand to about 13 times its original volume. It's role is to help prevent water loss and compaction, providing increased aeration and moisture retention. It is sterile and has a pH of approximately 7, or neutral. It is ready to use right out of the bag. This ingredient is dusty and a mask should be worn. Look for the OMRI seal on the brand you purchase.
Compressed Coconut Fiber or Coconut Coir (OMRI search: coconut fiber soil amendment)

Coconut fiber or coir is extracted from the husk of coconut. It is also very absorbent, while providing good aeration. It is a highly recommended substitute for peat moss because it is free of bacterial and fungal spores, and produces good results without the environmental damage caused by peat mining. Look for the OMRI seal.
Coconut fiber is sold in compress bricks or pucks. Follow the manufacturer's instructions to decompress your coconut coir and prepare it to be used as an ingredient in your starter mix.
Vermiculite (OMRI search: vermiculite soil amendment)

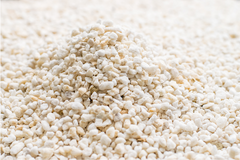
Vermiculite, like perlite is a mined mineral, which is then expanded by heating to 1,400℉. It is also used as a more sustainable substitute for peat in mixes. Like perlite, it is lightweight, very absorbent, and increases aeration and moisture retention, keeping your seedlings from drying out. Again, it comes in a bag and is ready to use. It is dusty and a mask should be worn. Again, look for the OMRI seal. This is our favorite soil amendment for ease of use and performance.
Our seed starting mix
The soil mix we use for starting plants is composed of just two ingredients— homemade garden compost and vermiculite. You can use your own compost or buy some in.
Your seed starting mix should not be too high in nutrients. If your soil is too rich, it can actually harm new seedlings.
The other threat is if the mix is too wet. This can cause rot and encourage fungal diseases, such as damping off. Vermiculite holds moisture while keeping the texture fluffy. Coconut coir or perlite are also options for holding moisture in your starter mix.
We mix by ratio. Choose a measuring container that makes sense for the amount of mix you intend to create. We use a tin can. It doesn’t matter what you use to measure your ingredients, as long as you’re consistent and end up with the correct proportions. We combine our ingredients in a five gallon bucket; when mixing larger quantities, we use a wheelbarrow.
Before measuring, sift your compost over a screen or sieve to break up any clumps and remove any unwanted debris, leaving a fine, even texture. Working over a wheelbarrow works well. Once you've your screened your compost, use this very simple recipe!

Basic Seed Starting Mix Recipe
10 parts compost
3 parts vermiculite
First step, wear a mask! Next, measure each ingredient using a can, scoop, or bucket of your choice. Mix the ingredients with a trowel or your hands. Take the time to mix thoroughly to ensure the vermiculite is evenly distributed. Store your starter mix in a sealed container or a moisture proof bag in a dry, cool place.
Prepping your mix for use
Moisten the seed starting mix to prepare to fill your trays. A pail with a lid works well for this step. Add water, close the lid of the pail, and give the water some time to soak in. If your mixture is dry, it will tend to repel the water at first.
As your mix gains moisture, it will readily absorb more. Moisten the mix a little at a time, cover, give it time to absorb, and then remix.
Moisten until your mix is damp but not sodden. You want your mix moist enough to flow, without dusting, but dry enough so that it doesn't clump or smear as you working with it.
You're Ready!
First, label your tray with the variety name and date of planting. Scoop and mound the starter mix in the middle of the tray. Use your hands or a straight edge to spread the starter mix across the cells and to the corners, so each cell is level full. Screed any excess back into your wheelbarrow or pail.
Now you are ready to plant your seeds according to the packet instructions. We start multiple seeds in each cell to maximize the use of our starter mix and the available space under our grow lights.
Make an indent in the soil, place the seed and cover to the appropriate depth. After planting, gently pat or press the soil to make good ‘seed to soil’ contact. If the seed needs light to germinate, place on the surface and gently press to seat your seed on top of the soil.
Carefully water the seed in. Since your starter mix is already moist, it will readily absorb the water. You do not want to cause the soil to wash, disturbing the soil depth and the positioning of the seeds in the cells.
Some recommend using a mister but we find it is difficult to water efficiently this way. You can use a watering can with a very fine holes to create a gentle watering ‘rose’.
Another option is to repurpose a well-rinsed dish soap bottle with a hole cut into one side to vent, allowing a free-flowing watering stream. This is our method of choice because it gives us more control over the amount of water we add to each cell. We use a circular motion, watering around each cell.

(Note: Make sure to clearly mark the vented side, so you don't accidentally tip your bottle the wrong way, spilling the water and making a mess! It happens!)
Cover your trays with a thin film of clear plastic; some trays come with a plastic dome. This covering prevents the soil from drying out until your seedlings germinate. You should not need to water again until your seedlings emerge.
Place your trays in a warm place, 70-80˚F. Seeds generally do not need light to sprout. The exception is seeds that are specifically labeled to be surface sown and 'need daylight to germinate'. However, actual daylight hours is sufficient for germination and no grow lights are required until after your seedlings begin to sprout and emerge.
Be vigilant! Pay attention to the packet information on the number of days to germination. Remove the plastic covering and provide light as soon as possible after emergence. Freshly sprouted seedlings can get 'leggy' fast!
Carefully monitor your new seedling trays for moisture levels. You do not want your seedlings to dry out at this point!
When a seedling emerges, it's leaves, known as 'seed leaves,' are actually cotyledons, which are part of the seed's embryo. They provide nutrients to the seedling until it's 'true' leaves unfurl to begin the process of photosynthesis.
Transplanting
Once your seedlings have formed their first 'true' leaves, it is time to singulate and transplant them into larger cells. In preparation for transplanting, make sure not to overwater your seedlings. The soil should be moist but not soggy, so it easily falls away from the roots as you remove your seedlings from the starter tray.
Be careful not to damage the stems or the roots of your seedlings in handling. Grasp them by their true leaves only-- separating them for transplanting. If they do not come apart easily, give them a gentle shake to dislodge more soil from the roots. As the soil falls away, separate the plants, paying attention to gently pull at the best angle, singulating with minimal tearing of the roots.
DO NOT grasp the seedling by the stems! This can pinch it's vascular system and damage the plant’s ability to transport nutrients and water. This is critical. Pay close attention to only handling the seedlings by the leaves, not the stems or the roots.
Once you have separated a seedling for transplant, use your little finger or a pencil to make a hole in the soil. Making sure the hole is deep and wide enough to accommodate the roots. This will allow you to insert the plant without handling or damaging the roots. Holding by the leaf, place the seedling at the depth you want it and pinch the dirt in around the roots and stem. Avoid the urge to 'pack' the soil; you may crush the roots. Watering will settle the soil around the roots just right.
Always water gently, using warm tepid water, never cold. Do not drown the plant. As before, we use a circular motion, watering all the way around each transplanted seedling to settle the soil around the roots and stem.
Good luck with all your seed starting and transplanting efforts!
Our best to you,
Theresa & Dan
